基本上所有的 iOSer 都是用过 CocoaPods 来管理 iOS 工程中的三方库,但是很少有系列文章来详细的解读 CocoaPods。笔者决定自行尝试一下。本文所有 CocoaPods 源码使用的是 1.5.3 版本。
Why Ruby?
笔者在日常工作中,在做一关于项目组件管理的效率工具,由于组内技术选型也确定了使用 Ruby 来开发,所以也花了一些时间入门了一下这门语言。纵观 CocoaPods 的代码,其中用到了很多 Ruby 的特性,并且 CocoaPods 的作者们也是深受 RoR 开发模式影响的一些工程师。为了整体把握 CocoaPods 这个项目,Ruby 这门脚本语言也建议去入门学习一下。
在 CocoaPods 中,很多代码片段用到了以下 Ruby 的特性或是 RoR 开发模式:
1. eval 特性
记得我第一次接触 eval 概念是在 SICP 中介绍的元语言抽象。例子讲述了用 Scheme 写出一个 Scheme 的解释器,其中依赖的自循环 Eval/Apply 解释器中,eval 过程即将一个表达式转换为取得其值的过程。
Ruby 也是具有 eval 的动态性,在 pry 中可以使用 eval 方法来测试它:
[1] > eval "100 * (100 + 1) / 2"
=> 5050
[2] > eval "puts 'Hello Ruby!'"
Hello Ruby!
=> nil
通过 eval 使得 Ruby 获得了更强大的动态能力,在运行时可以使用字符串来改变逻辑,而不是与传统的手动解析输入和输入语法树。
这个特性会在 cocoapods-core 中大量使用,用来解析 Podfile、Podfile.lock 和 .spec 文件。
2. Bundler 思想的铺垫
当笔者在入门 Ruby 开始学习写项目的开始,需要查询各种所需要的依赖库。而 rubygems.org 简直就是一个宝地,它例如我们 iOS 开发中 cocoapods.org 的角色,用于托管一个个 Gem 组件,从而避免了重复造轮子。但是只是托管 Gem 组件是远远不够的,因为本地和远程服务器上的组件由于时间原因总会出现版本差异的问题。
Bundler 诞生的原因之一就是需要解决依赖的版本问题。Bundler 使用了很多技巧性和启发式算法来解这个依赖图。从 CocoaPods 中的 Molinillo 算法中可以看出 Bundler 依赖图算法的影子,但是目前还不是特别的敏捷,个人觉得算法应该还有优化空间。另外,当 Bundler 每次运行后会通过一个 Gemfile.lock 来存储可行解,同样的 CocoaPods 中的 Podfile.lock 也是如此,通过 YAML 格式记录。这里推荐一篇文章: 为什么我们要使用 RVM / Bundler。
3. 强大的 plugin 开发能力
对 Class 和 Module 的扩展
这里我所理解的 plugin 开发也就是类似于我们在 iOS 中的 Category (Swift 的 Extension)。我们可以通过依赖库来对主仓 CocoaPods 的 Class 和 Module 进行动态操作。举个例子:
这个是在 CocoaPods 主仓中 downloader.rb 中的代码,其中定义了一些类方法:
# file: CocoaPods - cocoapods/downloader.rb

module Pod
  module Downloader
    require 'cocoapods/downloader/cache'
    require 'cocoapods/downloader/request'
    require 'cocoapods/downloader/response'

    def self.download(
      request,
      target,
      can_cache: true,
      cache_path: Config.instance.cache_root + 'Pods'
    )
      # ...
      end
    # ...
  end
end
但是在 cocoapods-downloader 模块中,Downloader 这个 module 的方法并不能满足全部需求,于是在 api.rb 中会看到这样的代码扩展:
# file: CocoaPods - cocoapods-downloader/api.rb

module Pod
  module Downloader
    module API
      def execute_command(executable, command, raise_on_failure = false)
        # ...
      end

      def check_exit_code!(executable, command, output)
        # ...
      end
  end
end
这也就好比在 iOS 开发中对某一个 Class 的 Category 扩展,可以为其增加方法、增加属性,甚至是重写方法。在 GitHub 有近百个关于 CocoaPods 的扩展和优化,这种代码随处可见。
值得一提的,在 Ruby 中使用类似于 ObjC 的 Method Swizzling 也随处可见。Ruby 中可简单的通过 alias_method 来对成员方法、类方法做到方法替换。
[1] pry(main)> class Test
[1] pry(main)*   def hello
[1] pry(main)*     p "hello"
[1] pry(main)*   end
[1] pry(main)* end
=> :hello
[2] pry(main)> class Test
[2] pry(main)*   alias_method :hello_old, :hello
[2] pry(main)*   def hello
[2] pry(main)*     p "hello world"
[2] pry(main)*   end
[2] pry(main)* end
=> :hello
[3] pry(main)> test = Test.new
=> #<Test:0x007fca3eb1d158>
[4] pry(main)> test.hello
"hello world"
=> "hello world"
Bundler 对于 Gem 开发的本地映射
在 CocoaPods 中,我们可以看到它的 gemfile 的写法是这样:
SKIP_UNRELEASED_VERSIONS = false

# 声明 CocoaPods 对于 git 仓库的依赖关系。
# 兼容本地 git 仓库模式开发
#
def cp_gem(name, repo_name, branch = 'master', path: false)
  return gem name if SKIP_UNRELEASED_VERSIONS
  # 如果 path 参数为 true,那么将在 "../[repo_name]" 这个路径下搜索仓库
  opts = if path
           { :path => "../#{repo_name}" }
         else
           # 否则拼接 git 仓库地址获取
           url = "https://github.com/CocoaPods/#{repo_name}.git"
           { :git => url, :branch => branch }
         end
  # 返回标准的 Gemfile Gem 导入格式
  gem name, opts
end

source 'https://rubygems.org'

gemspec

gem 'json', :git => 'https://github.com/segiddins/json.git', :branch => 'seg-1.7.7-ruby-2.2'

group :development do
  # 开发的 Gem 组件
  cp_gem 'claide',                'CLAide'
  cp_gem 'cocoapods-core',        'Core'
  cp_gem 'cocoapods-deintegrate', 'cocoapods-deintegrate'
  cp_gem 'cocoapods-downloader',  'cocoapods-downloader'
  cp_gem 'cocoapods-plugins',     'cocoapods-plugins'
  cp_gem 'cocoapods-search',      'cocoapods-search'
  cp_gem 'cocoapods-stats',       'cocoapods-stats'
  cp_gem 'cocoapods-trunk',       'cocoapods-trunk'
  cp_gem 'cocoapods-try',         'cocoapods-try'
  cp_gem 'molinillo',             'Molinillo'
  cp_gem 'nanaimo',               'Nanaimo'
  cp_gem 'xcodeproj',             'Xcodeproj'

  gem 'cocoapods-dependencies', '~> 1.0.beta.1'

  gem 'bacon'
  gem 'mocha'
  gem 'mocha-on-bacon'
  gem 'prettybacon'
  gem 'webmock'

  # 集成测试
  gem 'diffy'
  gem 'clintegracon'

  # 代码质量校验
  gem 'inch_by_inch'
  gem 'rubocop'

  gem 'danger'
end

group :debugging do
  gem 'cocoapods_debug'

  gem 'rb-fsevent'
  gem 'kicker'
  gem 'awesome_print'
  gem 'ruby-prof', :platforms => [:ruby]
end
在 Gemfile 中我们可以看到很多通过 cp_gem 装载的 Gem 库,并且如果发现有与 CocoaPods 项目目录同级的目录,则会使用对应的项目直接通过 Gem 加载。通过简单的目录分割和 Gemfile 管理,就实现了最基本又最直观的热插拔,对组件开发十分友好。所以你只要将多个仓库如下图方式排列,即可实现跨仓库组件开发:
# gua @ Guabook in ~/Desktop/cocoapod-dev [66:66:66]
$ ls -l
lrwxr-xr-x  1 gua  staff    31 Jul 30 21:34 CocoaPods
lrwxr-xr-x  1 gua  staff    26 Jul 31 13:27 Core
lrwxr-xr-x  1 gua  staff    31 Jul 31 10:14 Molinillo
lrwxr-xr-x  1 gua  staff    31 Aug 15 11:32 Xcodeproj
lrwxr-xr-x  1 gua  staff    42 Jul 31 10:14 cocoapods-downloader
当然选型为 Ruby 一定不仅仅有以下这些好处,有很多东西是我这个非专业 Rubyer 选手可以看出来的。如果有其他的优势可以帮我补充。
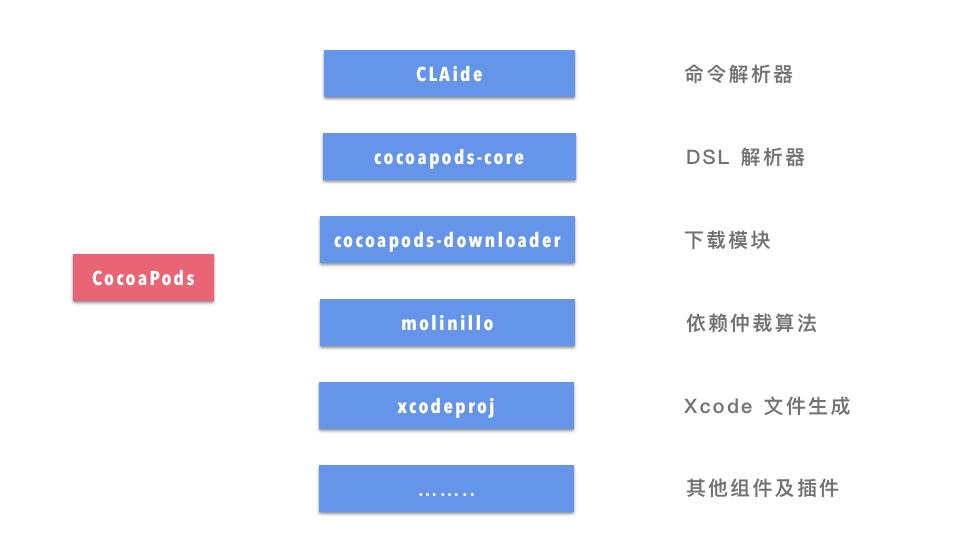
组件构成和对应职责
通过上面对于 Gemfile 的简单分析,可以看出 CocoaPods 不仅仅是一个仓库那么简单,它作为一个三方库版本管理工具,对自身组件的管理和组件化也是十分讲究的。我们继续来看这份 Gemfile:
# 开发的 Gem 组件

# CLAide 是一个命令的解析器
#通过简单的 API 提供命令的构造、参数解析、生成 help 等功能
cp_gem 'claide',                'CLAide'

# Core 用于 CocoaPods 中模板文件的解析
# 包括 Podfile、podspec 文件,还包括所有的 .lock 文件中特殊的 YAML 文件
cp_gem 'cocoapods-core',        'Core'

# cocoapods-deintegrate 用来从工程中删除所有的 CocoaPods 相关配置
cp_gem 'cocoapods-deintegrate', 'cocoapods-deintegrate'

# cocoapods-downloader CocoaPods 中的下载模块扩展
# 支持从 git, svn, hg, http, scp, bzr 多种协议,也有部分下载时候的优化策略
cp_gem 'cocoapods-downloader',  'cocoapods-downloader'

# cocoapods-plugins 插件管理功能
# 其中有 `pod plugin` 全套命令,支持对于 CocoaPods 插件的列表一览(list)、搜索(search)、创建(create)功能
cp_gem 'cocoapods-plugins',     'cocoapods-plugins'

# Pods 搜索工具
# 用来搜索 Pods 三方库
cp_gem 'cocoapods-search',      'cocoapods-search'

# Pods 组件数据统计插件
# 展示下载量等相关统计方面的信息
cp_gem 'cocoapods-stats',       'cocoapods-stats'

# 与 cocoapods.org 打通的命令行工具
# 用于查看个人用户信息、上传 spec 等操作
cp_gem 'cocoapods-trunk',       'cocoapods-trunk'

# Pods 组件 Demo 工程快速预览
cp_gem 'cocoapods-try',         'cocoapods-try'

# Pods 组件版本依赖仲裁算法
cp_gem 'molinillo',             'Molinillo'

# ascii 编码的 plist 文件 Ruby 原生解析库
cp_gem 'nanaimo',               'Nanaimo'

# 通过原生 Ruby 创建Xcode项目
cp_gem 'xcodeproj',             'Xcodeproj'
通过查看 Gemfile 可以看出 CocoaPods 对于组件的拆分粒度是比较细微的,通过对各种组件的组合达到现在的完整版本。这些组件中,笔者也仅仅零散的看过一点,由于组件群过于庞大。但是都能达到拆开去使用的程度。
例如,如果当对构建 Xcode 工程有校本化处理需求的时候,可以使用 Xcodeproj 来打开、修改、保存一个工程。例如使用 xcodeproj 来查看 Sepicat 项目的一些信息:
[1] pry(main)> require 'xcodeproj'
=> true
[2] pry(main)> XCODEPROJ_PATH = Pathname.new("/Users/gua/Desktop/git/Sepicat-dev/Sepicat/Sepicat/Sepicat.xcodeproj")
=> #<Pathname:/Users/gua/Desktop/git/Sepicat-dev/Sepicat/Sepicat/Sepicat.xcodeproj>
[3] pry(main)> project = Xcodeproj::Project.open(XCODEPROJ_PATH)
=> #<Xcodeproj::Project:0x3fe51f622d2c>
[4] pry(main)> project.targets
=> [#<Xcodeproj::Project::Object::PBXNativeTarget:0x3fe51f498e5c>, #<Xcodeproj::Project::Object::PBXNativeTarget:0x3fe51fc96410>]
[I'm 5] pry(main)> project.to_hash
=> {"objects"=>
  {"D59E24B31FB8861200B00B8C"=>
    {"isa"=>"PBXProject",
     "attributes"=>
      {"LastSwiftUpdateCheck"=>"0910",
       "LastUpgradeCheck"=>"0910",
       "ORGANIZATIONNAME"=>"Desgard_Duan",
       "TargetAttributes"=>
        {"D59E24BA1FB8861200B00B8C"=>
          {"CreatedOnToolsVersion"=>"9.1",
           "LastSwiftMigration"=>"0920",
           "ProvisioningStyle"=>"Automatic"},
         "D59E24CE1FB8861200B00B8C"=>
          {"CreatedOnToolsVersion"=>"9.1",
           "ProvisioningStyle"=>"Automatic",
           "TestTargetID"=>"D59E24BA1FB8861200B00B8C"}}},
           ...
这里我调用了 Project 这个 Class 的 to_hash 方法,它可以讲 xcodeproj 所有的环境变量以 Hash 方式返回并输出。当然,Xcodeproj 功能不止于此,在后续的系列文章中会有更多的使用方法。这里仅仅是来展示,所有的 Gem 组件是可以单独抽离出来使用的。
从一次 Install 命令来初探 CocoaPods 源码
命令入口
pod install 其实是 iOS 开发者在学习 CocoaPods 时学习的第一个命令,虽然网上已经有很多关于 pod install 的原理解析,但是作为系列第一篇,这个分析仍旧重要。我们打开终端到项目中的 Podfile 所在目录下,输入 pod install:
$ pod install每次当输入一个 pod xxx 命令的时候,首先系统会调用这个 pod 命令。所有的命令都是在 /bin 目录下存放的脚本,当然 Ruby 环境的也不例外。我们可以通过 command which pod 来查看命令所在位置:
$ command which pod
/Users/gua/.rvm/gems/ruby-2.4.1/bin/pod
出现 /Users/gua/.rvm/gems/ruby-2.4.1/bin/pod 而不是 /usr/local/bin/pod 的原因是因为我电脑中的 Ruby 版本是使用 RVM 进行版本控制的,所以会装在这么一个冗长的目录下。我们来看一下这个入口脚本执行了什么:
# pod
#!/usr/bin/env ruby_executable_hooks
#
# This file was generated by RubyGems.
#
#'cocoapods' 做为 Gem 组件被安装
# 这个脚本做为入口文件来唤醒 cocoapods
#

require 'rubygems'

version = ">= 0.a"

if ARGV.first
  str = ARGV.first
  # "BINARY" 是 ASCII-8BIT 别名
  str = str.dup.force_encoding("BINARY") if str.respond_to? :force_encoding
  # \A 代表输入的开始位置,\z 代表输入的结束
  if str =~ /\A_(.*)_\z/ and Gem::Version.correct?($1) then
    version = $1
    # shift 拿出第一个元素并移除
    ARGV.shift
  end
end

if Gem.respond_to?(:activate_bin_path)
  load Gem.activate_bin_path('cocoapods', 'pod', version)
else
  gem "cocoapods", version
  load Gem.bin_path("cocoapods", "pod", version)
end
入口中将命令的执行指向了 Gem 组件的 Path 中,这样就找到了 CocoaPods 的入口脚本,即在 cocoapods/bin 目录下的 pod。
#!/usr/bin/env ruby

# ... 忽略一些对于编码处理的代码

require 'cocoapods'

# 这里我手动输出一下调用栈,来关注一下
puts caller

if profile_filename = ENV['PROFILE']
  require 'ruby-prof'
  reporter =
    case (profile_extname = File.extname(profile_filename))
    when '.txt'
      RubyProf::FlatPrinterWithLineNumbers
    when '.html'
      RubyProf::GraphHtmlPrinter
    when '.callgrind'
      RubyProf::CallTreePrinter
    else
      raise "Unknown profiler format indicated by extension: #{profile_extname}"
    end
  File.open(profile_filename, 'w') do |io|
    # 实例化一个 Pods::Command 对象,并进入主流程
    reporter.new(RubyProf.profile { Pod::Command.run(ARGV) }).print(io)
  end
else
  # 实例化一个 Pods::Command 对象,并进入主流程
  Pod::Command.run(ARGV)
end
调用栈输出了两个方法:
/Users/gua/.rvm/gems/ruby-2.4.1/bin/pod:23:in `load'
/Users/gua/.rvm/gems/ruby-2.4.1/bin/pod:23:in `<main>'
/Users/gua/.rvm/gems/ruby-2.4.1/bin/ruby_executable_hooks:24:in `eval'
/Users/gua/.rvm/gems/ruby-2.4.1/bin/ruby_executable_hooks:24:in `<main>'
ruby_executable_hooks 通过 bin 目录下的 pod 入口唤醒,再通过 eval 的手段调起我们需要的 CocoaPods 工程。这是 Bundler 的自身行为。
在入口的最后部分,发现通过调用 Pod::Command.run(ARGV),实例化了一个 CLAide::Command 对象,于是用户输入的命令及层数从此进入CLAide 解析阶段。这里不对 CLAide 这个命令解析工具做过多的分析,这个是后面系列文章的内容,我们仅仅知道,它是一个根据继承来自动生成命令层级的命令解析工具,每次命令的执行,其实是对应到具体 Class 的 run 方法。
module Pod
# hello
  class Command
    class Install < Command
      # .. 省略很多参数定义
      def run
        # 判断是否存在 Podfile 文件
        # 不存在直接回抛出 "No `Podfile' found in the project directory." 的警告,终止程序
        verify_podfile_exists!

        # 从 Config 中获取一个 Instraller 实例
        installer = installer_for_config

        # 默认是不执行 update
        installer.repo_update = repo_update?(:default => false)
        installer.update = false
        installer.deployment = @deployment

        # install 的真正过程
        installer.install!
      end
    end
  end
end首先根据上面的描述,Install 是继承于 Command 命令的,所以对应的命令为 pod install。pod install 过程是依赖于 Podfile 文件的,所以在入口处会做检测,这个错误信息也是我们经常见到的错误信息之一。在 installer 实例组装完成之后,调用其 installer.install! 方法,这时候才进入了我们 pod install 命令的主体部分。
执行功能主体
接着 installer.install!,发现其实这也是一个高度封装的入口方法,具体代码如下:
def install!
  # 检测是否在 Pods 内部,如果不是则做一些 install 前准备工作
  prepare
  # 依赖图的解析
  resolve_dependencies
  # 依赖下载
  download_dependencies
  # 检验所有的 targets
  validate_targets
  # 生成外层项目
  generate_pods_project
  if installation_options.integrate_targets?
    # 集成用户配置,读取依赖项,使用 xcconfig 来配置
    integrate_user_project
  else
    UI.section 'Skipping User Project Integration'
  end
  # 执行任何 install 后的操作,例如一些 plugin 可以插在这里
  perform_post_install_actions
end
Install 环境准备流程 - prepare
先来看 prepare 方法的实现:
def prepare
  # 如果检测出当前目录是 Pods,直接 raise 终止
  if Dir.pwd.start_with?(sandbox.root.to_path)
    message = 'Command should be run from a directory outside Pods directory.'
    message << "\n\n\tCurrent directory is #{UI.path(Pathname.pwd)}\n"
    raise Informative, message
  end
  UI.message 'Preparing' do
    # 如果 lock 文件的 CocoaPods 版本和当前版本不同,需要使用新版本依赖的 xcodeproj 对工程文件进行更新
    deintegrate_if_different_major_version
    # 对 sandbox(Pods) 目录建立子目录结构
    sandbox.prepare
    # 检测 PluginManager 是否有 pre-install 的 plugin
    ensure_plugins_are_installed!
    # 执行插件中 pre-install 的所有 hooks 方法
    run_plugins_pre_install_hooks
  end
end
在 prepare 阶段会将 pod install 的准备工作完成,包括版本一致性、目录接口以及 pre-install 的装载插件脚本全部取出。之后我们来到 CocoaPods 中最复杂的依赖解析环节。
依赖解析流程 - resolve_dependencies
def resolve_dependencies
  # 获取 Sources
  plugin_sources = run_source_provider_hooks

  # 创建一个 Analyzer
  # Analyzer 是通过分析 Podfile, Podfile.lock, 沙盒中的 manifest 从而生成了一张依赖关系表
  analyzer = create_analyzer(plugin_sources)

  # 如果带有 repo_update 标记
  UI.section 'Updating local specs repositories' do
    # 执行 Analyzer 的更新 Repo 操作
    analyzer.update_repositories
  end if repo_update?

  UI.section 'Analyzing dependencies' do
    # 从 analyzer 取出最新的分析结果
    analyze(analyzer)

    # 个人调试使用,用于输出所有的 dependencies 缓存列表
    @analysis_result.podfile_dependency_cache.podfile_dependencies.each { |item| p item }
    # p @analysis_result.podfile_state
    # p @analysis_result.sandbox_state
    @analysis_result.specs_by_target.keys.each do |item|
      @analysis_result.specs_by_target[item].each do |sub_item|
        p sub_item
      end
    end

    # 拼写错误降级识别,白名单过滤
    validate_build_configurations

    # 清除并重新生成目录,更新 Pods 目录结构
    clean_sandbox
  end
  analyzer
end
依赖解析过程我们暂时只要知道通过 Podfile、Podfile.lock、manifest 文件来生成一个 Analyzer 对象。Analyzer 内部会使用 Molinillo (具体的是 Molinillo::DependencyGraph 图算法)从而得到解析结果。我们可以分别输出 @analysis_result 的 podfile_dependency_cache.podfile_dependencies 来查看 Podfile 文件的依赖分析结果,也可以从 specs_by_target 来查看各个 target 相关的 specs。总之,通过 Analyzer 能获取到很多关于依赖的信息。
另外,需要区分的是,在 pod install 的过程有有一个 pre-download 的阶段,也就是我们在 verbose 下看到的 Fetching external sources 过程。这个 pre-download 阶段不属于 Download 过程,而是在当前的 依赖分析过程。这里主要是解决当我们通过 git 地址引入的 Pod 仓的情况,系统无法从默认的 Source 拿到对应的 Spec,需要直接访问我们的 git 地址下载仓库的 zip 包,并取出对应的 podspec 文件,从而拿来分析。
# Sepicat 的 Podfile 解析结果
<Pod::Dependency name=SnapKit requirements=~> 4.0.0 source=nil external_source=nil>
<Pod::Dependency name=CocoaLumberjack/Swift requirements=~> 3.3.0 source=nil external_source=nil>
<Pod::Dependency name=pop requirements=~> 1.0 source=nil external_source=nil>
<Pod::Dependency name=Alamofire requirements=~> 4.5 source=nil external_source=nil>
<Pod::Dependency name=ObjectMapper requirements=~> 3.1 source=nil external_source=nil>
<Pod::Dependency name=AlamofireObjectMapper requirements=~> 5.0 source=nil external_source=nil>
<Pod::Dependency name=SDWebImage requirements=~> 4.0 source=nil external_source=nil>
<Pod::Dependency name=NVActivityIndicatorView requirements=~> 4.1 source=nil external_source=nil>
<Pod::Dependency name=LTMorphingLabel requirements=~> 0.5.3 source=nil external_source=nil>
<Pod::Dependency name=ReachabilitySwift requirements=>= 0 source=nil external_source=nil>
<Pod::Dependency name=KVOController requirements=~> 1.2.0 source=nil external_source=nil>
<Pod::Dependency name=EFQRCode requirements=~> 4.3.0 source=nil external_source=nil>
<Pod::Dependency name=PySwiftyRegex requirements=~> 2.0.1 source=nil external_source=nil>
<Pod::Dependency name=SwiftyUserDefaults requirements=>= 0 source=nil external_source={:git=>"https://github.com/Sepicat/SwiftyUserDefaults.git"}>
<Pod::Dependency name=AcknowList requirements=~> 1.5 source=nil external_source=nil>
<Pod::Dependency name=MJRefresh requirements=~> 3.0 source=nil external_source=nil>
<Pod::Dependency name=SwiftMessages requirements=~> 4.1.2 source=nil external_source=nil>
<Pod::Dependency name=SkeletonView requirements=~> 1.2.1 source=nil external_source=nil>
<Pod::Dependency name=ViewAnimator requirements=~> 2.1 source=nil external_source=nil>
<Pod::Dependency name=Highlightr requirements=>= 0 source=nil external_source={:git=>"https://github.com/Sepicat/Highlightr.git"}>
<Pod::Dependency name=WCLShineButton requirements=>= 0 source=nil external_source={:git=>"https://github.com/Sepicat/WCLShineButton.git"}>
<Pod::Dependency name=ActiveLabel requirements=>= 0 source=nil external_source={:git=>"https://github.com/optonaut/ActiveLabel.swift.git"}>
<Pod::Dependency name=XLPagerTabStrip requirements=>= 0 source=nil external_source={:git=>"https://github.com/Sepicat/XLPagerTabStrip.git"}>
<Pod::Dependency name=Fabric requirements=>= 0 source=nil external_source=nil>
<Pod::Dependency name=Crashlytics requirements=>= 0 source=nil external_source=nil>
<Pod::Dependency name=Firebase/Core requirements=>= 0 source=nil external_source=nil>
<Pod::Dependency name=Curiouscat requirements=>= 0 source=nil external_source={:git=>"https://github.com/Sepicat/Curiouscat.git", :commit=>"9f3bb2c2440a7d11a5dd74255d0fee8e4a4cdb67"}>
<Pod::Dependency name=Straycat requirements=>= 0 source=nil external_source={:path=>"./../../Straycat"}>

# Sepicat 工程中各个 target 对应 spec 情况
<Pod::Podfile::TargetDefinition label=Pods>
<Pod::Podfile::TargetDefinition label=Pods-Sepicat>
<Pod::Specification name="AcknowList">
<Pod::Specification name="ActiveLabel">
<Pod::Specification name="Alamofire">
<Pod::Specification name="AlamofireObjectMapper">
<Pod::Specification name="CocoaLumberjack/Default">
<Pod::Specification name="CocoaLumberjack/Swift">
<Pod::Specification name="Crashlytics">
<Pod::Specification name="Curiouscat">
<Pod::Specification name="EFQRCode">
<Pod::Specification name="Fabric">
<Pod::Specification name="Firebase/Core">
<Pod::Specification name="Firebase/CoreOnly">
<Pod::Specification name="FirebaseAnalytics">
<Pod::Specification name="FirebaseCore">
<Pod::Specification name="FirebaseInstanceID">
<Pod::Specification name="GoogleAppMeasurement">
<Pod::Specification name="GoogleUtilities/AppDelegateSwizzler">
<Pod::Specification name="GoogleUtilities/Environment">
<Pod::Specification name="GoogleUtilities/Logger">
<Pod::Specification name="GoogleUtilities/MethodSwizzler">
<Pod::Specification name="GoogleUtilities/NSData+zlib">
<Pod::Specification name="GoogleUtilities/Network">
<Pod::Specification name="GoogleUtilities/Reachability">
<Pod::Specification name="Highlightr">
<Pod::Specification name="KVOController">
<Pod::Specification name="Kanna">
<Pod::Specification name="LTMorphingLabel">
<Pod::Specification name="MJRefresh">
<Pod::Specification name="NVActivityIndicatorView">
<Pod::Specification name="NVActivityIndicatorView/Presenter">
<Pod::Specification name="ObjectMapper">
<Pod::Specification name="PySwiftyRegex">
<Pod::Specification name="ReachabilitySwift">
<Pod::Specification name="SDWebImage">
<Pod::Specification name="SDWebImage/Core">
<Pod::Specification name="SkeletonView">
<Pod::Specification name="SnapKit">
<Pod::Specification name="Straycat">
<Pod::Specification name="SwiftMessages">
<Pod::Specification name="SwiftMessages/App">
<Pod::Specification name="SwiftSoup">
<Pod::Specification name="SwiftyUserDefaults">
<Pod::Specification name="ViewAnimator">
<Pod::Specification name="WCLShineButton">
<Pod::Specification name="XLPagerTabStrip">
<Pod::Specification name="nanopb">
<Pod::Specification name="nanopb/decode">
<Pod::Specification name="nanopb/encode">
<Pod::Specification name="pop">
<Pod::Podfile::TargetDefinition label=Pods-SepicatTests>
按需下载依赖过程 - download_dependencies
def download_dependencies
  UI.section 'Downloading dependencies' do
    # 初始化 sandbox 文件访问器
    create_file_accessors
    # 构造 Pod Source Installer
    install_pod_sources
    # 执行 pre install 的 hooks
    run_podfile_pre_install_hooks
    # 根据配置清理 pod sources 信息,主要是清理无用 platform 相关内容
    clean_pod_sources
  end
end
在这一步骤中,最重要的是 install_pod_sources 过程。install_pod_sources 过程会调用对应 Pod 的 install! 方法。在 create_file_accessors 中会创建 sandbox 目录的文件访问器,通过构造 FileAccessor 实例来解析沙盒中的各种文件。
接下来我们主要来看看 install_pod_sources 这个方法的实现:
def install_pod_sources
  @installed_specs = []
  # install 的 Pod 只需要这两种状态,added 和 changed 状态的并集
  pods_to_install = sandbox_state.added | sandbox_state.changed
  title_options = { :verbose_prefix => '-> '.green }
  puts "root_specs"
  root_specs.each do |item|
    puts item
  end
  # 将 Podfile 解析后排序处理
  root_specs.sort_by(&:name).each do |spec|
    # 如果是 added 状态或 changed 状态的 Pod
    if pods_to_install.include?(spec.name)
      # 如果是 changed 状态并且 manifest 已经有记录
      if sandbox_state.changed.include?(spec.name) && sandbox.manifest
        # 版本更新
        current_version = spec.version
        # 被更新版本记录
        previous_version = sandbox.manifest.version(spec.name)
        # 变动记录
        has_changed_version = current_version != previous_version
        # 找到第一个包含 spec.name 的 Pod,获取对应的 Repo,其实就是 find 方法
        current_repo = analysis_result.specs_by_source.detect { |key, values| break key if values.map(&:name).include?(spec.name) }
        # puts "current_repo : #{current_repo}"
        # puts "current_repo : #{current_repo.url}"
        # puts "current_repo : #{current_repo.name}"
        # 获取当前仓库
        current_repo &&= current_repo.url || current_repo.name
        # 获取之前该仓库的信息
        previous_spec_repo = sandbox.manifest.spec_repo(spec.name)
        # 是否仓库有变动
        has_changed_repo = !previous_spec_repo.nil? && current_repo && (current_repo != previous_spec_repo)
        title = "Installing #{spec.name} #{spec.version}"
        title << " (was #{previous_version} and source changed to `#{current_repo}` from `#{previous_spec_repo}`)" if has_changed_version && has_changed_repo
        title << " (was #{previous_version})" if has_changed_version && !has_changed_repo
        title << " (source changed to `#{current_repo}` from `#{previous_spec_repo}`)" if !has_changed_version && has_changed_repo
      else
        # 非 changed 状态,展示 Installing 这个是经常见的
        title = "Installing #{spec}"
      end
      UI.titled_section(title.green, title_options) do
        # 通过 name 拿到对应的 installer,记录到 @pod_installers 中
        install_source_of_pod(spec.name)
      end
    else
      # 如果没有 changed 情况,直接展示 Using ,也是经常见到的 log
      UI.titled_section("Using #{spec}", title_options) do
        # 通过文件获取到 installer 实例,记录到 @pod_installers 中
        create_pod_installer(spec.name)
      end
    end
  end
end

# 通过缓存返回 PodSourceInstaller 实例
def create_pod_installer(pod_name)
  specs_by_platform = {}
  pod_targets.each do |pod_target|
    if pod_target.root_spec.name == pod_name
      specs_by_platform[pod_target.platform] ||= []
      specs_by_platform[pod_target.platform].concat(pod_target.specs)
    end
  end

  raise Informative, "Could not install '#{pod_name}' pod. There is no target that supports it." if specs_by_platform.empty?

  @pod_installers ||= []
  # 通过 sandbox, specs 的 platform 信息生成 Installer 实例
  pod_installer = PodSourceInstaller.new(sandbox, specs_by_platform, :can_cache => installation_options.clean?)
  @pod_installers << pod_installer
  puts "pod_installer ->  #{pod_installer}"
  puts "specs_by_platform -> #{specs_by_platform}"
  pod_installer
end

# 安装 Pods。如果 resolver 声明一个 Pod 已经安装或者已经存在,
# 将会将其删除并重新安装。如果不存在则直接安装。
#
# @return [void]
#
def install_source_of_pod(pod_name)
  pod_installer = create_pod_installer(pod_name)
  pod_installer.install!
  @installed_specs.concat(pod_installer.specs_by_platform.values.flatten.uniq)
end
install_pod_sources 总结下来,就是根据依赖分析的结果,通过 name 拿到所有依赖的 installer 实例。在方法的开始,root_specs 方法是通过 analysis_result 拿出所有根 spec。
def root_specs
  # 会取出所有的 root spec
  analysis_result.specifications.map(&:root).uniq
end
下面再来看看 install! 到底做了什么工作。调用 install! 是所有生成 Installer 实例的目的。在 pod_source_installer.rb 中有 install! 方法的实现:
def install!
  # 如果未经历 pre-download 阶段或是 local 的 Pod,通过对应的 Source 下载
  download_source unless predownloaded? || local?
  # 执行 Spec 中的 Preparer Command
  PodSourcePreparer.new(root_spec, root).prepare! if local?
end
其实 install! 中主要就是将 Pod 通过对应的 Source 下载下来,其中会调用 cocoapods-downloader 组件来处理所有的下载逻辑。
验证 Target 流程 - validate_targets
validate_targets 过程用来验证之前流程中的产物 pod 所生成的 Targets 的合法性方法。这个方法只是简单的验证了一下。validate_targets 方法的主要作用就是构造 TargetValidator,并执行 validate! 方法:
def validate_targets
  # puts "validate_targets -> #{aggregate_targets}"
  # puts "pod_targets -> #{pod_targets}"
  # aggregate 工程中的 Target
  # Pods 所有 Target
  validator = Xcode::TargetValidator.new(aggregate_targets, pod_targets)
  validator.validate!
end

# target_validator.rb
def validate!
  # 重名检测
  verify_no_duplicate_framework_and_library_names
  # framework 包裹的静态库检测
  verify_no_static_framework_transitive_dependencies
  # 验证 Pod 中是否指明多个 Swift 版本
  verify_no_pods_used_with_multiple_swift_versions
  # 验证 Swift 的 Pod 是否有 module 依赖
  verify_swift_pods_have_module_dependencies
end
验证环节在整个 Install 过程中仅占很小的一部分。因为只是验证部分,是完全解耦的。(我尝试过将整个 validate_targets 注释掉,install 过程)
-
verify_no_duplicate_framework_and_library_names用来验证是否有重名的framework,如果有冲突会直接抛出 frameworks with conflicting names 异常。 -
verify_no_static_framework_transitive_dependencies用来验证动态库中是否有静态库或者 framework 静态库,如果有直接抛出异常。给定一个场景,如果 A 组件依赖 B 组件,B 组件中通过vendored_libraries加载的静态库(.a或者.framework),如果此时使用了use_framework!,打包的时候,framework会将vendored_libraries中的内容包括进来,这要就在符号决议的时候产生冲突。但其实动态库中依赖静态库这是一种很常见的情况,所以在搜索引擎中检索异常 Logtransitive dependencies that include static binaries:可以查到很多对应解决方案,但主要方法是:- 修改 pod 库中
podspec,增加pod_target_xcconfig,定义好FRAMEWORK_SEARCH_PATHS和OTHER_LDFLAGS两个环境变量; - hook
verify_no_static_framework_transitive_dependencies的方法,将其干掉!对应 issue
- 修改 pod 库中
vendored_libraries用来在spec文件中指定依赖的静态库,例如微博 SDK 中的s.vendored_libraries = 'libWeiboSDK/libWeiboSDK.a'。
-
verify_swift_pods_have_module_dependencies用来检测 Swift 的 framework 中是否有 Module Dependencies,如果有的话需要检查这些依赖是否需要进行build,判断的条件是:1. 是否有代码文件;2. 是否定义了module。目前还没有明确的场景,笔者对 Module Dependencies 的定义也比较模糊,后续跟进; -
verify_no_pods_used_with_multiple_swift_versions用来检测是否所有的 Pod Target 中版本一致性问题。
工程文件生成 - generate_pods_project
工程文件的生成是 pod install 的最后一步,他会将之前版本仲裁后的所有组件通过 Project 文件的形式组织起来,并且会对 Project 中做一些用户指定的配置。
def generate_pods_project(generator = create_generator)
  UI.section 'Generating Pods project' do
    # 执行 generator 的 generate 方法
    # 里面包含五步骤:
    #     1. prepare - 准备 Pod Project 的基础配置,也会组装 sandbox 中所有 Pod 的 path,组装 build setting 的基础配置
    #     2. install_file_references - 组装文件应用,其中包括源文件引用、framework 的 bundle、静态库文件、资源文件、链接头文件
    #     3. install_libraries - 对于所有的 Targets 和 Pod Targets 组装头文件的绝对路径
    #     4. integrate_targets - 整合 Targets,对 Targets 做一些配置
    #     5. set_target_dependencies - 对于每个 Target 增加 Pod 依赖关系,并完成链接
    generator.generate!
    # 取出 project 实例
    @pods_project = generator.project
    # 执行 Podfile 中的 post_install 的 hook 方法
    run_podfile_post_install_hooks
    # 保存生成的 Project 文件
    # 在保存之前也会做一些优化过程,例如会检测一下 Pods 是否为空,Dev Pods 是否为空,也会校验 Pods 工程文件中的所有文件的 Deterministic UUID 等
    generator.write
    # 将 Development 的 scheme 变成 share 状态
    generator.share_development_pod_schemes
    # 写 lock 文件
    write_lockfiles
  end
end
在 install 过程中,除去依赖仲裁部分和下载部分的时间消耗,在工程文件生成也会有相对较大的时间开销。这里往往也是速度优化核心位置。在最新的 1.6.1 版本中,这个环节被大量的重构优化,后续我们看以对比两个版本一探究竟。
文件释义
-
Podfile- 由用户实现的关于 Target 与 Pod 关系的声明规范。注意,这里有 Target 和 Pod 的关系,这些是Podfile.lock中无法拿到的。 -
Podfile.lock- 包括安装 Pod 的所有信息,对应 Pod 的版本号、Git 地址、Branch 信息、Commit 信息、Tag 信息(Git、Branch、Commit、Tag 均为 Git Label 依赖)、Local Path 信息(Development Pod 模式)。也包含了所有 Pod 的最终决议版本、二级子依赖列表、使用的 Source、spec 文件的 Checksum。
- 这里的 Checksum 可以理解成是一个文件的 MD5 编码,不同文件的 Checksum 不同。在 CocoaPods 1.5.3 和 Cocoapods 1.6.1 中,Sepc 文件的 Checksum发生了变化,由之前的原文件变成了 spec 序列化之后的 json 文件的 MD5,这个后续系列文中会讲到。
- Source 的意思是对应 spec 仓库的 Git 地址。一般大厂中往往会自己维护一个或多个 spec 仓库,从而有利于组件版本的控制。
Manifest.lock-Pods目录中包含的文件,用于跟踪本地安装的 Pod。如果在install过程中检查到与之前的缓存相同就会直接使用缓存版本,而其根据就是Manifest.lock文件。在每次install完毕后,Manifest.lock会被重写成最新的Podfile.lock文件。
结语
当我们知道 CocoaPods 在 install 的大致过程后,我们可以对其做一些修改和控制。例如知道了 pre_install 和 post_install 的具体时机,我们就可以在 Podfile 中执行对应的 Ruby 脚本,达到我们的预期。
后续,学习 CocoaPods 中每一个组件的实现,将所有的问题在代码中找到答案。